
When to Use This Article: Use this guide if your site uses FormAssembly for forms. If you're using Gravity Forms instead, see Gravity Forms documentation.
TABLE OF CONTENTS
- About FormAssembly
- Prerequisites
- How to Embed a FormAssembly Form
- Troubleshooting Common Issues
- Best Practices
- Additional Resources
- Need Help?
About FormAssembly
FormAssembly is a powerful form builder that integrates with your WordPress site through a plugin. It's particularly useful for:
- Complex forms with conditional logic
- Forms that connect to Salesforce or other CRM systems
- Registration forms with payment processing
- Forms requiring advanced data validation or workflows
Prerequisites
Before embedding a form, make sure:
1. Verify the FormAssembly Plugin is Active
- Log in to your WordPress admin panel
- Navigate to Plugins in the left sidebar
- Look for "FormAssembly" in your installed plugins list
- The plugin status should show "Active" (usually in green or blue text)
If the plugin is not installed or active: Contact Gameflow support to activate it for your site.
2. Save your domain shortname (one time only)
If your FormAssembly account is at mydomain.tfaforms.net, your shortname is mydomain. Go to Groundplan Theme Settings, enter it in FormAssembly Domain Shortname, and click Update. Enter only the first part of the address. If your forms are hosted on app.formassembly.com, leave the field blank.
How to Embed a FormAssembly Form
Step 1: Create Your Form in FormAssembly
- Log in to your FormAssembly account
- Build your form using FormAssembly's form builder
- Test your form to ensure it's working correctly
- Publish the form in FormAssembly
Step 2: Get Your Form ID
- In FormAssembly, find your form in the Forms list
- Look for the Form ID number - it appears above the form title and looks like a number (e.g., 4715407)
- Copy this number - you'll need it in the next step

The Form ID appears above your form title in FormAssembly.
Step 3: Add the form to your page
Edit the page, post, or event where the form should appear, and click into the content area.
Click the FormAssembly Form button in the editor toolbar.
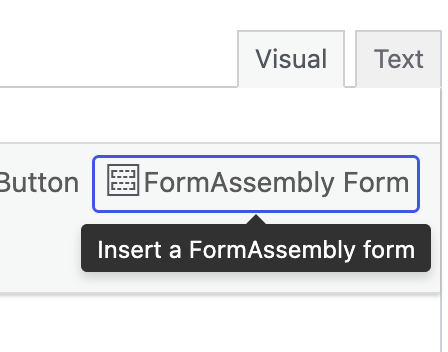
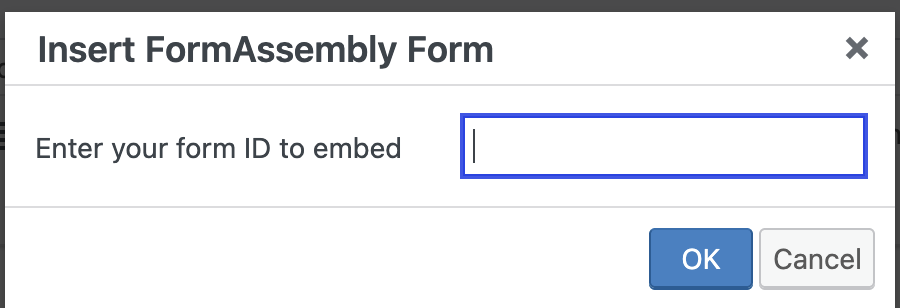
Enter the form ID and click OK. The button inserts a shortcode with your domain shortname already filled in:
[formassembly formid=4419382 shortname="mydomain"]Keep the shortcode on its own line.
For the same steps inside WordPress, open the Help tab at the top of any edit screen and choose FormAssembly Forms.
Basic Shortcode Format
- All FormAssembly clients should now be migrated to their own unique domain, e.g. 'myshortname.tfaforms.net'
[formassembly formid=123456 shortname="myshortname"]
- In WordPress, go to Pages and create a new page or edit an existing one
- In the page editor, create or select a tab where you want the form to appear
- Add a Content Block field for that tab
- Switch to the Text editor view (not Visual editor)
- Paste your shortcode (see above)
- Make sure the shortcode is on its own line with no extra spaces
Advanced Shortcode Options
Display form in an iframe:
If you experience styling conflicts between your site and the form, or if your server doesn't support the default publishing method, use the iframe option:
[formassembly formid=123456 iframe=1]
Control form size with custom CSS:
You can add CSS styling to control the form or iframe dimensions:
[formassembly formid=123456 iframe=1 style="width: 100% !important;"]
Step 4: Publish and Test
- Click Update or Publish to save your page
- View the page on your live site
- Test the form by filling it out and submitting it
- Verify the submission appears in FormAssembly
Troubleshooting Common Issues
Form Doesn't Appear
Possible causes:
- Plugin not active: Verify FormAssembly plugin is activated (see Prerequisites above)
- Wrong Form ID: Double-check you copied the correct Form ID from FormAssembly
- Wrong domain shortname: check the shortname in Groundplan Theme Settings. A wrong shortname points the site to a domain that doesn't exist.
- Shortcode in Visual editor: Make sure you pasted the shortcode in Text editor mode, not Visual mode
- Extra characters: Ensure no spaces or extra characters around the form ID number. Use formid=123456 not formid='123456' or formid="123456"
Form Appears But Doesn't Submit
Possible causes:
- Form not published in FormAssembly: Check that your form is published (not in draft mode) in FormAssembly
- FormAssembly account issue: Verify your FormAssembly account is active and the form is not disabled
Form Looks Wrong or Styling is Off
Solutions:
- Try iframe mode: Add iframe=1 to your shortcode to isolate the form styling from your WordPress theme. Since version 2.3, embedded forms pick up your site's styling and drop the extra spacing around the embed. Try the default embed before switching to
iframe=1. - Check FormAssembly theme: Review your form's theme settings in FormAssembly - you may need to adjust colors to match your site
- Width issues: Use the style parameter to control form width: style="width: 100% !important;" or style="width: 600px !important;"
- Some custom CSS on your WordPress site may interfere with form styling. Contact Gameflow support if styling issues persist.
Embed a Workflow
- to embed a FormAssembly workflow instead of a form, add
workflowid={id}to your embed code
Best Practices
- Test before going live: Always test your form on a staging or preview version before publishing
- Set up notifications: Configure email notifications in FormAssembly so you know when forms are submitted
- Check mobile display: View your form on a mobile device to ensure it displays correctly
Additional Resources
- FormAssembly Documentation - Complete FormAssembly help center
- FormAssembly WordPress Plugin Guide - Official WordPress integration documentation
- Creating Your First Form - FormAssembly beginner guide
Need Help?
If you're still having trouble embedding your FormAssembly form, contact Gameflow support by submitting a ticket on this page.